1 nps工具介绍
NPS工具是一款使用go语言编写的轻量级、功能强大的内网穿透工具。支持TCP、UDP流量转发,支持内网HTTP、SOCKS5代理,同时支持snappy压缩(节省带宽和流量)、站点保护、加密传输、多路复用、header修改等。同时还支持web图形化管理。该工具使用简单,相比于FRP,NPS是图形化界面,因此配置更加简单。
nps同frp工作原理相似。
官方文档:
https://ehang-io.github.io/nps/#/api
1.1 nps服务端与客户端
NPS工具由NPS服务器端和NPS客户端组成,我们一般将NPS服务器端放在具有公网IP的VPS上,并且会开启一个端口等待NPS的客户端进行连接(一般会在NPS服务器的配置文件中进行说明),而NPS的客户端一般会被放在我们已经拿下的内网主机上,我们会指定NPS服务器的客户端需要连接的NPS服务器的IP和端口,这样,我们就成功的将NPS的服务器端和NPS的客户端连接了起来。
1.2 nps内网穿透
按照上面的方法,我们已经配置好了NPS服务,现在服务器端和客户端是可以连通的,但是,我们又怎么可以通过NPS进行内网穿透呢?其实,NPS是会在配置文件里面设置图形化界面的登录后台,我们通过登录NPS的后台,然后使用配置文件中设置的账号密码进行登录,登录后台之后,首先添加一个客户端,这个客户端会自动生成一个唯一验证密钥,我们需要在配置文件中输入这个唯一验证密钥,这样就可以将NPS的客户端和服务端连接起来了,随后我们可以根据我们的需求添加隧道,如HTTP隧道、SOCKS隧道等多条隧道,我们通过隧道设置的端口进行访问,即可访问到内网主机。
2 下载安装
2.1 下载
下载地址:
https://github.com/ehang-io/nps/releases/tag/v0.26.9
实验环境:
服务器:鲲鹏arm 64 架构
虚拟机centos:amd 64架构
win10:amd64架构
查看服务器版本:
# 服务器
[root@charles frp]# arch
aarch64

# 虚拟机 centos
[root@slave1 tools]# arch
x86_64
2.2 服务端安装与配置
linux
tar -zxvf linux_arm64_server.tar.gz
./nps install
windows
nps.exe install
配置文件
[root@charles socks]# cd conf/
[root@charles conf]# ll
total 12
-rw-r--r-- 1 1001 116    0 Oct  6  2020 clients.json
-rw-r--r-- 1 1001 116    0 Oct  6  2020 hosts.json
-rwxr-xr-x 1 1001 116 1926 Oct  6  2020 nps.conf
-rw-r--r-- 1 1001 116 1679 Oct  6  2020 server.key
-rw-r--r-- 1 1001 116 1346 Oct  6  2020 server.pem
-rw-r--r-- 1 1001 116    0 Oct  6  2020 tasks.json
[root@charles conf]# vim nps.conf
appname = nps
#Boot mode(dev|pro)
runmode = dev
http_proxy_ip=0.0.0.0 (官方下载下来没有此项)
http_proxy_port=80 # 域名代理http代理监听端口
https_proxy_port=443 # 域名代理https代理监听端口(一般会修改这两个端口,避免端口冲突)
https_just_proxy=true
#default https certificate setting
https_default_cert_file=conf/server.pem
https_default_key_file=conf/server.key
#
bridge_type=tcp # 客户端与服务端连接方式kcp或tcp
bridge_port=8024 # 服务端客户端通信端口,也就是说客户端通过访问服务端的这个端口可以进行连接
bridge_ip=0.0.0.0
# Public password, which clients can use to connect to the server
public_vkey=123 # 客户端以配置文件模式启动时的密钥,设置为空表示关闭客户端配置文件连接模式
#Traffic data persistence interval(minute)
#Ignorance means no persistence
#flow_store_interval=1
log_level=7 # 日志输出级别
#log_path=nps.log
#Whether to restrict IP access, true or false or ignore
#ip_limit=true
#p2p
#p2p_ip=127.0.0.1
#p2p_port=6000
#web
web_host=a.o.com
web_username=admin # web界面管理账号
web_password=123 # web界面管理密码
web_port = 8080 # web管理端口,通过访问该端口可以访问NPS后台
web_ip=0.0.0.0
web_base_url= # web管理主路径,用于将web管理置于代理子路径后面
web_open_ssl=false
web_cert_file=conf/server.pem
web_key_file=conf/server.key
# if web under proxy use sub path. like http://host/nps need this.
#web_base_url=/nps
#Web API unauthenticated IP address(the len of auth_crypt_key must be 16)
#Remove comments if needed
#auth_key=test
auth_crypt_key =1234567812345678 # 获取服务端authKey时的aes加密密钥,16位
#allow_ports=9001-9009,10001,11000-12000
#Web management multi-user login
allow_user_login=false
allow_user_register=false
allow_user_change_username=false
#extension
allow_flow_limit=false
allow_rate_limit=false
allow_tunnel_num_limit=false
allow_local_proxy=false
allow_connection_num_limit=false
allow_multi_ip=false
system_info_display=false
#cache
http_cache=false
http_cache_length=100
#get origin ip
http_add_origin_header=false
#pprof debug options
#pprof_ip=0.0.0.0
#pprof_port=9999
#client disconnect timeout
disconnect_timeout=60 # 客户端连接超时,单位 5s,默认值 60,即 300s = 5mins
注意:在上面的配置文件中,我们主要是要注意以下方面:
①:一般会修改域名代理的端口,避免端口冲突
②:NPS的web页面默认端口是8080,默认用户名密码是admin/123
③:NPS的服务端和客户端进行连接的默认端口是8024,这个端口可以进行修改,修改之后,在连接时注意使用修改后的端口
④:NPS服务端开启的端口(也就是我们需要访问的VPS的端口)不在配置文件中,需要我们web界面中进行配置
2.3 客户端
tar -zxvf linux_amd64_client_nps.tar.gz
2.3 客户端连接方式
2.3.1 客户端连接方式
方法一:使用vkey进行连接
Windows:npc.exe -server=ip:port -vkey=服务端生成的key
Linux:./npc -server=ip:port -vkey=服务端生成的key
方法二:使用配置文件进行连接
windows:   npc.exe -config=npc配置文件路径
linux:     ./npc -config=npc配置文件路径
2.3.2 配置文件
cd conf
vim npc.conf
[common]
server_addr=127.0.0.1:8024
conn_type=tcp
vkey=123
auto_reconnection=true
max_conn=1000
flow_limit=1000
rate_limit=1000
basic_username=11
basic_password=3
web_username=user
web_password=1234
crypt=true
compress=true
#pprof_addr=0.0.0.0:9999
disconnect_timeout=60

[health_check_test1]
health_check_timeout=1
health_check_max_failed=3
health_check_interval=1
health_http_url=/
health_check_type=http
health_check_target=127.0.0.1:8083,127.0.0.1:8082

[health_check_test2]
health_check_timeout=1
health_check_max_failed=3
health_check_interval=1
health_check_type=tcp
health_check_target=127.0.0.1:8083,127.0.0.1:8082

[web]
host=c.o.com
target_addr=127.0.0.1:8083,127.0.0.1:8082

[tcp]
mode=tcp
target_addr=127.0.0.1:8080
server_port=10000

[socks5]
mode=socks5
server_port=19009
multi_account=multi_account.conf

[file]
mode=file
server_port=19008
local_path=/Users/liuhe/Downloads
strip_pre=/web/

[http]
mode=httpProxy
server_port=19004

[udp]
mode=udp
server_port=12253
target_addr=114.114.114.114:53

[ssh_secret]
mode=secret
password=ssh2
target_addr=123.206.77.88:22

[ssh_p2p]
mode=p2p
password=ssh3

[secret_ssh]
local_port=2001
password=ssh2

[p2p_ssh]
local_port=2002
password=ssh3
注意:NPS的客户端启动有两种启动方式,一种是不需要配置文件,直接输入相关命令即可启动,另一种是使用配置文件启动NPS客户端。如果需要使用配置文件来启动NPS客户端,那么需要配置如下内容(其余内容可以忽略)。
server_addr   #服务端ip/域名:port
conn_type     #与服务端通信模式(tp或kcp)
vkey          #服务端配置文件中的密钥
首先server_addr*是需要填写NPS服务端的IP和端口,*conn_type选择合适的类型(一般选择TCP),vkey的值设置为服务端配置文件的密钥。这样服务端和客户端就可以进行连接了。
3 使用
3.1 服务端
3.1.1 修改配置
避免端口冲突
vim ./conf/nps.conf
http_proxy_port=8000
https_proxy_port=4430
重载配置文件
./nps reload
3.1.2 启动/关闭/重启服务端
./nps start
停止与重启
./nps stop
./nps restart
3.1.3 访问
服务端配置文件的web部分客户查看用户名和密码,也可以通过配置文件分配一个域名
默认用户名:admin
默认密码:123
http://121.**.**.124:8080/

3.1.4 新建客户端
这块新建的客户端主要是要使用生成的唯一验证密钥,通过这个唯一验证密钥才能将NPS的服务端和客户端连接起来,因此至少需要添加一个客户端。
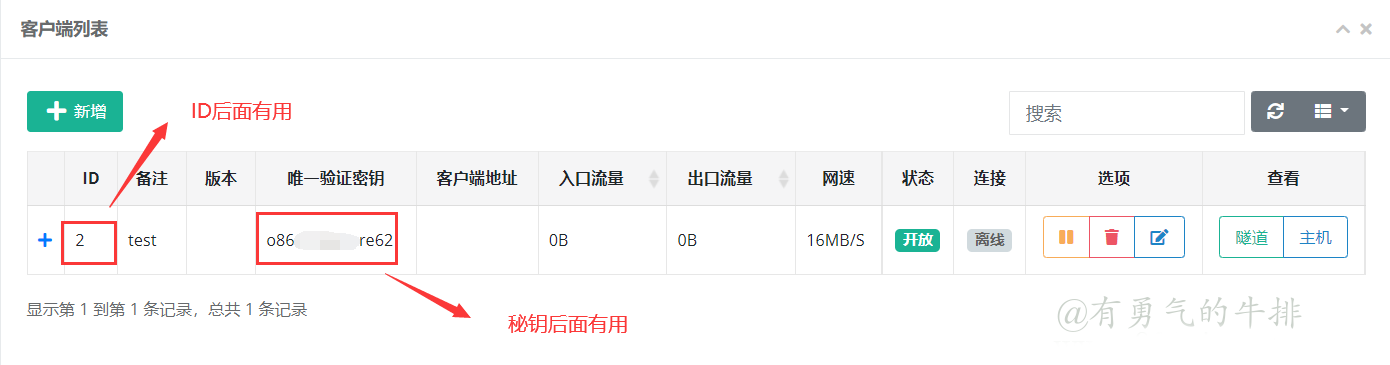
3.1.5 添加SOCKS代理


3.2 客户端
3.2.1 无配置文件
Windows:npc.exe -server=ip:port -vkey=服务端生成的key
Linux:./npc -server=ip:port -vkey=服务端生成的key
linux测试
./npc -server=121.**.**.124:8024 -vkey=o86e5rilpj9cre62

客户端连接成功
还有怎么使用
3.2.2 有配置文件
此模式使用nps的公钥或者客户端私钥验证,各种配置在客户端完成,同时服务端web也可以进行管理
修改配置文件(客户端:内网主机)
vim ./conf/npc.conf
[common]
server_addr=121.**.**.124:8024
conn_type=tcp
vkey=123
执行下列命令
格式
windows:   npc.exe -config=npc配置文件路径
linux:     ./npc -config=npc配置文件路径
linux测试
./npc -config=./conf/npc.conf
连接成功,后面还有什么代理访问
4 nps代理ssh服务
4.1 服务端创建TCP隧道

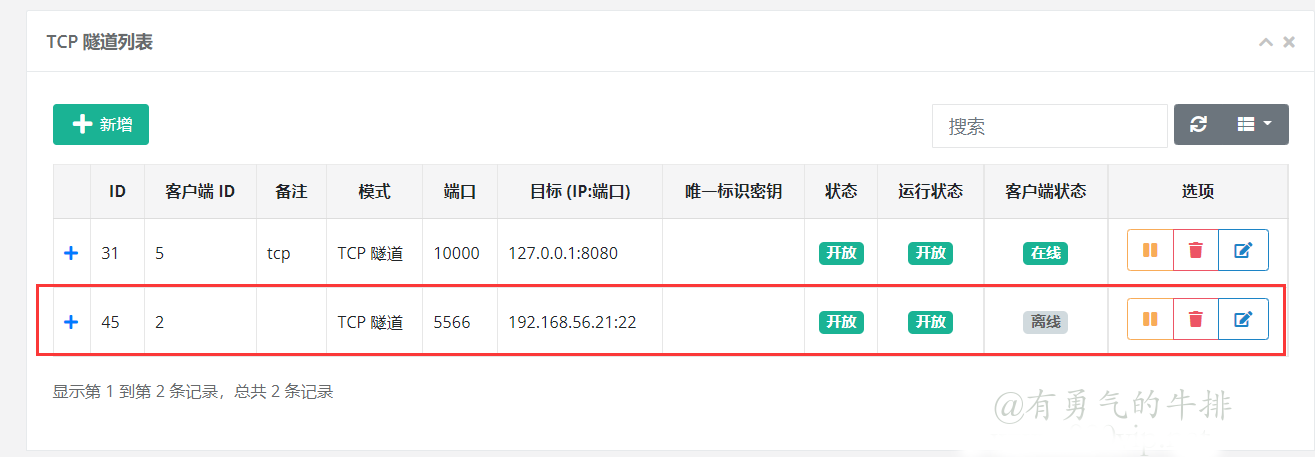
4.3 启动客户端连接服务端
./npc -server=ip:port -vkey=服务端生成的key
./npc -server=121.**.**.124:8024 -vkey=o86e5rilpj9cre62
4.4 任意一台linux主机访问
ssh root@121.**.**.124 -p 5566
<h2><a id="1_nps_0"></a>1 nps工具介绍</h2>
<p>NPS工具是一款使用go语言编写的轻量级、功能强大的内网穿透工具。支持TCP、UDP流量转发,支持内网HTTP、SOCKS5代理,同时支持snappy压缩(节省带宽和流量)、站点保护、加密传输、多路复用、header修改等。同时还支持web图形化管理。该工具使用简单,相比于FRP,NPS是图形化界面,因此配置更加简单。</p>
<p>nps同frp工作原理相似。</p>
<p>官方文档:</p>
<p>https://ehang-io.github.io/nps/#/api</p>
<h3><a id="11_nps_14"></a>1.1 nps服务端与客户端</h3>
<p>NPS工具由NPS服务器端和NPS客户端组成,我们一般将NPS服务器端放在具有公网IP的VPS上,并且会开启一个端口等待NPS的客户端进行连接(一般会在NPS服务器的配置文件中进行说明),而NPS的客户端一般会被放在我们已经拿下的内网主机上,我们会指定NPS服务器的客户端需要连接的NPS服务器的IP和端口,这样,我们就成功的将NPS的服务器端和NPS的客户端连接了起来。</p>
<h3><a id="12_nps_20"></a>1.2 nps内网穿透</h3>
<p>按照上面的方法,我们已经配置好了NPS服务,现在服务器端和客户端是可以连通的,但是,我们又怎么可以通过NPS进行内网穿透呢?其实,NPS是会在配置文件里面设置图形化界面的登录后台,我们通过登录NPS的后台,然后使用配置文件中设置的账号密码进行登录,登录后台之后,首先添加一个客户端,这个客户端会自动生成一个唯一验证密钥,我们需要在配置文件中输入这个唯一验证密钥,这样就可以将NPS的客户端和服务端连接起来了,随后我们可以根据我们的需求添加隧道,如HTTP隧道、SOCKS隧道等多条隧道,我们通过隧道设置的端口进行访问,即可访问到内网主机。</p>
<h2><a id="2__24"></a>2 下载安装</h2>
<h3><a id="21__26"></a>2.1 下载</h3>
<p>下载地址:</p>
<p>https://github.com/ehang-io/nps/releases/tag/v0.26.9</p>
<p>实验环境:</p>
<p>服务器:鲲鹏arm 64 架构</p>
<p>虚拟机centos:amd 64架构</p>
<p>win10:amd64架构</p>
<p>查看服务器版本:</p>
<pre><div class="hljs"><code class="lang-shell"><span class="hljs-meta"># </span><span class="language-bash">服务器</span>
[root@charles frp]# arch
aarch64
<span class="hljs-meta">
# </span><span class="language-bash">虚拟机 centos</span>
[root@slave1 tools]# arch
x86_64
</code></div></pre>
<h3><a id="22___58"></a>2.2 服务端安装与配置</h3>
<p>linux</p>
<pre><div class="hljs"><code class="lang-shell">tar -zxvf linux_arm64_server.tar.gz
./nps install
</code></div></pre>
<p>windows</p>
<pre><div class="hljs"><code class="lang-shell">nps.exe install
</code></div></pre>
<p><strong>配置文件</strong></p>
<pre><div class="hljs"><code class="lang-shell">[root@charles socks]# cd conf/
[root@charles conf]# ll
total 12
-rw-r--r-- 1 1001 116 0 Oct 6 2020 clients.json
-rw-r--r-- 1 1001 116 0 Oct 6 2020 hosts.json
-rwxr-xr-x 1 1001 116 1926 Oct 6 2020 nps.conf
-rw-r--r-- 1 1001 116 1679 Oct 6 2020 server.key
-rw-r--r-- 1 1001 116 1346 Oct 6 2020 server.pem
-rw-r--r-- 1 1001 116 0 Oct 6 2020 tasks.json
</code></div></pre>
<pre><code class="lang-">[root@charles conf]# vim nps.conf
</code></pre>
<pre><div class="hljs"><code class="lang-shell">appname = nps
<span class="hljs-meta">#</span><span class="language-bash">Boot mode(dev|pro)</span>
runmode = dev
http_proxy_ip=0.0.0.0 (官方下载下来没有此项)
http_proxy_port=80 # 域名代理http代理监听端口
https_proxy_port=443 # 域名代理https代理监听端口(一般会修改这两个端口,避免端口冲突)
https_just_proxy=true
<span class="hljs-meta">#</span><span class="language-bash">default https certificate setting</span>
https_default_cert_file=conf/server.pem
https_default_key_file=conf/server.key
<span class="hljs-meta">
#</span><span class="language-bash"><span class="hljs-comment">#bridge</span></span>
bridge_type=tcp # 客户端与服务端连接方式kcp或tcp
bridge_port=8024 # 服务端客户端通信端口,也就是说客户端通过访问服务端的这个端口可以进行连接
bridge_ip=0.0.0.0
<span class="hljs-meta">
# </span><span class="language-bash">Public password, <span class="hljs-built_in">which</span> clients can use to connect to the server</span>
public_vkey=123 # 客户端以配置文件模式启动时的密钥,设置为空表示关闭客户端配置文件连接模式
<span class="hljs-meta">
#</span><span class="language-bash">Traffic data persistence interval(minute)</span>
<span class="hljs-meta">#</span><span class="language-bash">Ignorance means no persistence</span>
<span class="hljs-meta">#</span><span class="language-bash">flow_store_interval=1</span>
log_level=7 # 日志输出级别
<span class="hljs-meta">#</span><span class="language-bash">log_path=nps.log</span>
<span class="hljs-meta">
#</span><span class="language-bash">Whether to restrict IP access, <span class="hljs-literal">true</span> or <span class="hljs-literal">false</span> or ignore</span>
<span class="hljs-meta">#</span><span class="language-bash">ip_limit=<span class="hljs-literal">true</span></span>
<span class="hljs-meta">
#</span><span class="language-bash">p2p</span>
<span class="hljs-meta">#</span><span class="language-bash">p2p_ip=127.0.0.1 <span class="hljs-comment"># 服务端IP,使用p2p模式必填</span></span>
<span class="hljs-meta">#</span><span class="language-bash">p2p_port=6000 <span class="hljs-comment"># p2p模式开启的udp端口</span></span>
<span class="hljs-meta">
#</span><span class="language-bash">web</span>
web_host=a.o.com
web_username=admin # web界面管理账号
web_password=123 # web界面管理密码
web_port = 8080 # web管理端口,通过访问该端口可以访问NPS后台
web_ip=0.0.0.0
web_base_url= # web管理主路径,用于将web管理置于代理子路径后面
web_open_ssl=false
web_cert_file=conf/server.pem
web_key_file=conf/server.key
<span class="hljs-meta"># </span><span class="language-bash"><span class="hljs-keyword">if</span> web under proxy use sub path. like http://host/nps need this.</span>
<span class="hljs-meta">#</span><span class="language-bash">web_base_url=/nps</span>
<span class="hljs-meta">
#</span><span class="language-bash">Web API unauthenticated IP address(the len of auth_crypt_key must be 16)</span>
<span class="hljs-meta">#</span><span class="language-bash">Remove comments <span class="hljs-keyword">if</span> needed</span>
<span class="hljs-meta">#</span><span class="language-bash">auth_key=<span class="hljs-built_in">test</span></span>
auth_crypt_key =1234567812345678 # 获取服务端authKey时的aes加密密钥,16位
<span class="hljs-meta">
#</span><span class="language-bash">allow_ports=9001-9009,10001,11000-12000</span>
<span class="hljs-meta">
#</span><span class="language-bash">Web management multi-user login</span>
allow_user_login=false
allow_user_register=false
allow_user_change_username=false
<span class="hljs-meta">
#</span><span class="language-bash">extension</span>
allow_flow_limit=false
allow_rate_limit=false
allow_tunnel_num_limit=false
allow_local_proxy=false
allow_connection_num_limit=false
allow_multi_ip=false
system_info_display=false
<span class="hljs-meta">
#</span><span class="language-bash">cache</span>
http_cache=false
http_cache_length=100
<span class="hljs-meta">
#</span><span class="language-bash">get origin ip</span>
http_add_origin_header=false
<span class="hljs-meta">
#</span><span class="language-bash">pprof debug options</span>
<span class="hljs-meta">#</span><span class="language-bash">pprof_ip=0.0.0.0 <span class="hljs-comment"># debug pprof 服务端IP</span></span>
<span class="hljs-meta">#</span><span class="language-bash">pprof_port=9999 <span class="hljs-comment"># debug pprof 端口</span></span>
<span class="hljs-meta">
#</span><span class="language-bash">client disconnect <span class="hljs-built_in">timeout</span></span>
disconnect_timeout=60 # 客户端连接超时,单位 5s,默认值 60,即 300s = 5mins
</code></div></pre>
<p><strong>注意:在上面的配置文件中,我们主要是要注意以下方面:</strong></p>
<p>①:一般会修改域名代理的端口,避免端口冲突</p>
<p>②:NPS的web页面默认端口是8080,默认用户名密码是admin/123</p>
<p>③:NPS的服务端和客户端进行连接的默认端口是8024,这个端口可以进行修改,修改之后,在连接时注意使用修改后的端口</p>
<p>④:NPS服务端开启的端口(也就是我们需要访问的VPS的端口)不在配置文件中,需要我们web界面中进行配置</p>
<h3><a id="23__189"></a>2.3 客户端</h3>
<pre><code class="lang-">tar -zxvf linux_amd64_client_nps.tar.gz
</code></pre>
<h3><a id="23__195"></a>2.3 客户端连接方式</h3>
<h4><a id="231__197"></a>2.3.1 客户端连接方式</h4>
<p>方法一:使用vkey进行连接</p>
<pre><div class="hljs"><code class="lang-shell">Windows:npc.exe -server=ip:port -vkey=服务端生成的key
Linux:./npc -server=ip:port -vkey=服务端生成的key
</code></div></pre>
<p>方法二:使用配置文件进行连接</p>
<pre><div class="hljs"><code class="lang-shell">windows: npc.exe -config=npc配置文件路径
linux: ./npc -config=npc配置文件路径
</code></div></pre>
<h4><a id="232__213"></a>2.3.2 配置文件</h4>
<pre><div class="hljs"><code class="lang-shell">cd conf
vim npc.conf
</code></div></pre>
<pre><div class="hljs"><code class="lang-shell">[common]
server_addr=127.0.0.1:8024
conn_type=tcp
vkey=123
auto_reconnection=true
max_conn=1000
flow_limit=1000
rate_limit=1000
basic_username=11
basic_password=3
web_username=user
web_password=1234
crypt=true
compress=true
<span class="hljs-meta">#</span><span class="language-bash">pprof_addr=0.0.0.0:9999</span>
disconnect_timeout=60
[health_check_test1]
health_check_timeout=1
health_check_max_failed=3
health_check_interval=1
health_http_url=/
health_check_type=http
health_check_target=127.0.0.1:8083,127.0.0.1:8082
[health_check_test2]
health_check_timeout=1
health_check_max_failed=3
health_check_interval=1
health_check_type=tcp
health_check_target=127.0.0.1:8083,127.0.0.1:8082
[web]
host=c.o.com
target_addr=127.0.0.1:8083,127.0.0.1:8082
[tcp]
mode=tcp
target_addr=127.0.0.1:8080
server_port=10000
[socks5]
mode=socks5
server_port=19009
multi_account=multi_account.conf
[file]
mode=file
server_port=19008
local_path=/Users/liuhe/Downloads
strip_pre=/web/
[http]
mode=httpProxy
server_port=19004
[udp]
mode=udp
server_port=12253
target_addr=114.114.114.114:53
[ssh_secret]
mode=secret
password=ssh2
target_addr=123.206.77.88:22
[ssh_p2p]
mode=p2p
password=ssh3
[secret_ssh]
local_port=2001
password=ssh2
[p2p_ssh]
local_port=2002
password=ssh3
</code></div></pre>
<p>注意:NPS的客户端启动有两种启动方式,一种是不需要配置文件,直接输入相关命令即可启动,另一种是使用配置文件启动NPS客户端。如果需要使用配置文件来启动NPS客户端,那么需要配置如下内容(其余内容可以忽略)。</p>
<pre><div class="hljs"><code class="lang-shell">server_addr #服务端ip/域名:port
conn_type #与服务端通信模式(tp或kcp)
vkey #服务端配置文件中的密钥
</code></div></pre>
<p>首先server_addr*是需要填写NPS服务端的IP和端口,*conn_type选择合适的类型(一般选择TCP),vkey的值设置为服务端配置文件的密钥。这样服务端和客户端就可以进行连接了。</p>
<h2><a id="3__313"></a>3 使用</h2>
<h3><a id="31__315"></a>3.1 服务端</h3>
<h4><a id="311__319"></a>3.1.1 修改配置</h4>
<p>避免端口冲突</p>
<pre><div class="hljs"><code class="lang-shell">vim ./conf/nps.conf
</code></div></pre>
<pre><div class="hljs"><code class="lang-ini"><span class="hljs-attr">http_proxy_port</span>=<span class="hljs-number">8000</span>
<span class="hljs-attr">https_proxy_port</span>=<span class="hljs-number">4430</span>
</code></div></pre>
<p>重载配置文件</p>
<pre><div class="hljs"><code class="lang-shell">./nps reload
</code></div></pre>
<h4><a id="312__338"></a>3.1.2 启动/关闭/重启服务端</h4>
<pre><div class="hljs"><code class="lang-shell">./nps start
</code></div></pre>
<p>停止与重启</p>
<pre><div class="hljs"><code class="lang-shell">./nps stop
./nps restart
</code></div></pre>
<h4><a id="313__351"></a>3.1.3 访问</h4>
<p>服务端配置文件的web部分客户查看用户名和密码,也可以通过配置文件分配一个域名</p>
<p>默认用户名:admin</p>
<p>默认密码:123</p>
<pre><div class="hljs"><code class="lang-shell">http://121.**.**.124:8080/
</code></div></pre>
<p><img src="https://www.couragesteak.com/tcos/article/483365e3ae525c33e24a4efb816a70bb.png" alt="nps访问服务端面板" /></p>
<h4><a id="314__365"></a>3.1.4 新建客户端</h4>
<p>这块新建的客户端主要是要使用生成的唯一验证密钥,通过这个唯一验证密钥才能将NPS的服务端和客户端连接起来,因此至少需要添加一个客户端。</p>
<p><img src="https://www.couragesteak.com/tcos/article/57fc4d1f4f8a510c6c6f35d92dc51719.png" alt="nps新建客户端" /></p>
<h4><a id="315_SOCKS_371"></a>3.1.5 添加SOCKS代理</h4>
<p><img src="https://www.couragesteak.com/tcos/article/6a11e0068a453c428208a41c501939f1.png" alt="nps添加SOCKS代理" /></p>
<p><img src="https://www.couragesteak.com/tcos/article/34d1f9dcb3939bd4433174889cad433b.png" alt="nps客户端列表" /></p>
<h3><a id="32__379"></a>3.2 客户端</h3>
<h4><a id="321__381"></a>3.2.1 无配置文件</h4>
<pre><div class="hljs"><code class="lang-shell">Windows:npc.exe -server=ip:port -vkey=服务端生成的key
Linux:./npc -server=ip:port -vkey=服务端生成的key
</code></div></pre>
<p>linux测试</p>
<pre><div class="hljs"><code class="lang-shell">./npc -server=121.**.**.124:8024 -vkey=o86e5rilpj9cre62
</code></div></pre>
<p><img src="https://www.couragesteak.com/tcos/article/e11e16421e8679ca0cf2e60f7526a817.png" alt="nps客户端连接" /></p>
<p>客户端连接成功</p>
<p>还有怎么使用</p>
<h4><a id="322__404"></a>3.2.2 有配置文件</h4>
<p>此模式使用nps的公钥或者客户端私钥验证,各种配置在客户端完成,同时服务端web也可以进行管理</p>
<p>修改配置文件(客户端:内网主机)</p>
<pre><div class="hljs"><code class="lang-shell">vim ./conf/npc.conf
</code></div></pre>
<pre><div class="hljs"><code class="lang-ini"><span class="hljs-section">[common]</span>
<span class="hljs-attr">server_addr</span>=<span class="hljs-number">121</span>.**.**.<span class="hljs-number">124</span>:<span class="hljs-number">8024</span> <span class="hljs-comment"># vps ip:port</span>
<span class="hljs-attr">conn_type</span>=tcp <span class="hljs-comment"># 连接类型</span>
<span class="hljs-attr">vkey</span>=<span class="hljs-number">123</span> <span class="hljs-comment"># 设置key</span>
</code></div></pre>
<p>执行下列命令</p>
<p>格式</p>
<pre><div class="hljs"><code class="lang-shell">windows: npc.exe -config=npc配置文件路径
linux: ./npc -config=npc配置文件路径
</code></div></pre>
<p>linux测试</p>
<pre><div class="hljs"><code class="lang-shell">./npc -config=./conf/npc.conf
</code></div></pre>
<p>连接成功,后面还有什么代理访问</p>
<h2><a id="4_npsssh_440"></a>4 nps代理ssh服务</h2>
<h3><a id="41_TCP_442"></a>4.1 服务端创建TCP隧道</h3>
<p><img src="https://www.couragesteak.com/tcos/article/4c20660056ce4eb19ea297fbba6f3678.png" alt="nps ssh服务端创建TCP隧道" /></p>
<p><img src="https://www.couragesteak.com/tcos/article/d0e601b747d37bcfc1fc1ec6c3e0a65a.png" alt="nps ssh服务端创建TCP隧道 客户端" /></p>
<h3><a id="43__448"></a>4.3 启动客户端连接服务端</h3>
<pre><div class="hljs"><code class="lang-shell">./npc -server=ip:port -vkey=服务端生成的key
</code></div></pre>
<pre><div class="hljs"><code class="lang-shell">./npc -server=121.**.**.124:8024 -vkey=o86e5rilpj9cre62
</code></div></pre>
<h3><a id="44_linux_458"></a>4.4 任意一台linux主机访问</h3>
<pre><div class="hljs"><code class="lang-shell">ssh root@121.**.**.124 -p 5566
</code></div></pre>

评论区