k8s 资源编排 yaml
有勇气的牛排
1707
云原生
2021-08-26 21:57:34
Table of Contents
1 yaml介绍
1.1 yaml 文件概述
k8s集群中对资源管理和资源对象编排部署都可以通过声明样式(yaml)文件来解决,也就是可以把需要对资源对象操作编辑到的yaml格式文件中,我们把这种文件叫做资源清单文件,通过kubectl命令直接使用资源清单文件,通过kubectl命令直接使用资源清单文件就可以实现对大量的资源对象进行编排部署了。
1.2 yaml文件书写格式
(1)yaml介绍
- yaml:仍是一种标记语言。为了强调这种语言以数据作为中心,而不是以标记语言为重点。
- yaml是一个可读性高,用来表达数据序列的格式。
(2)yaml基本语法
- 使用空格作为缩进
- 缩进的空格数据不重要,只要相同层级的元素左侧对齐即可。
1.3 yaml实例
查看k8s版本
kubectl api-versions
查看资源类型
kubectl api-resources
apiVersion: apps/v1
kind: Deployment
metedata:
name:nginx-deployment
namespace: default
spec:
replicas: 3
selector:
matchLabels:
app: nginx
template:
metadata:
labels:
app: nginx
spec:
containers:
- name: nginx
image: nginx:latest
port:
- containerPort: 80
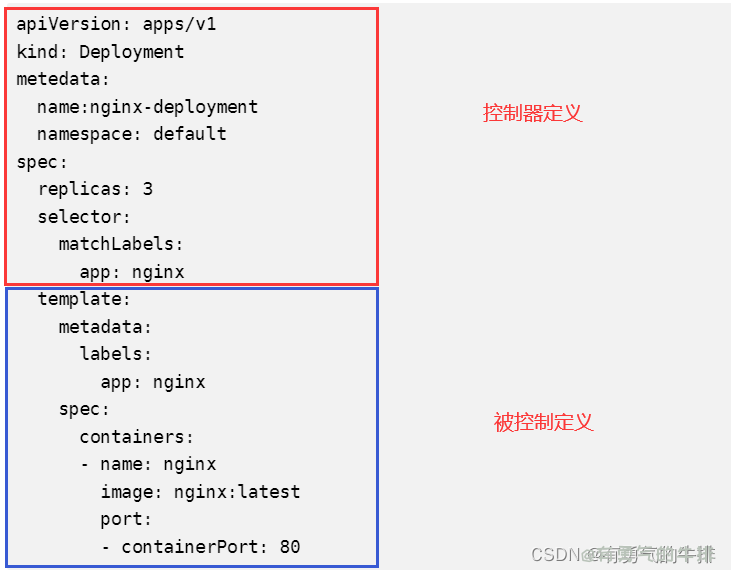
apiVersion:API版本
kind:资源类型
metadata:资源元数据
spec:资源规格
replicas:副本数量
selector:标签选择器
template:Pod模板
metadata:Pod元数据
spec:Pod规格
容器配置:容器配置
2 yaml文件快速编写
2.1 kubectl create命令生成
资源未部署,可以使用
1、创建资源 my-nginx
kubectl create deployment my-nginx
2、将创建my-nginx资源过程用yaml生成
基于上一步
kubectl create deployment my-nginx --image=nginx -o yaml
3、尝试运行,但并不真运行
基于上一步
kubectl create deployment my-nginx --image=nginx -o yaml --dry-run
3、生成yaml,并保存到文件
基于上一步
kubectl create deployment my-nginx --image=nginx -o yaml --dry-run > my-nginx.yaml
然后根据实际,修改里面的内容
将nginx相关内容,以yaml文件形式导出
kubectl get deploy nginx -o=yaml --export > my-nginx02.yaml
已知:1.20已经不支持:--export ,故直接 > 导出即可
kubectl get deploy nginx -o=yaml --export > my-nginx02.yaml
其他方法:
直接rancher平台,web生成
参考地址:
https://www.bilibili.com/video/BV1GT4y1A756
<p><h3>Table of Contents</h3><ul><ul><li><a href="#1_yaml_2">1 yaml介绍</a></li><ul><li><a href="#11_yaml__4">1.1 yaml 文件概述</a></li><li><a href="#12_yaml_8">1.2 yaml文件书写格式</a></li><li><a href="#13_yaml_20">1.3 yaml实例</a></li></ul><li><a href="#2_yaml_70">2 yaml文件快速编写</a></li><ul><li><a href="#21_kubectl_create_72">2.1 `kubectl create`命令生成</a></li><li><a href="#22_kubectl_getyaml_105">2.2 `kubectl get`命令到处yaml文件</a></li></ul></ul></ul></p>
<h2><a id="1_yaml_2"></a>1 yaml介绍</h2>
<h3><a id="11_yaml__4"></a>1.1 yaml 文件概述</h3>
<p>k8s集群中对资源管理和资源对象编排部署都可以通过声明样式(yaml)文件来解决,也就是可以把需要对资源对象操作编辑到的yaml格式文件中,我们把这种文件叫做资源清单文件,通过kubectl命令直接使用资源清单文件,通过kubectl命令直接使用资源清单文件就可以实现对大量的资源对象进行编排部署了。</p>
<h3><a id="12_yaml_8"></a>1.2 yaml文件书写格式</h3>
<p>(1)yaml介绍</p>
<ul>
<li>yaml:仍是一种标记语言。为了强调这种语言以数据作为中心,而不是以标记语言为重点。</li>
<li>yaml是一个可读性高,用来表达数据序列的格式。</li>
</ul>
<p>(2)yaml基本语法</p>
<ul>
<li>使用空格作为缩进</li>
<li>缩进的空格数据不重要,只要相同层级的元素左侧对齐即可。</li>
</ul>
<h3><a id="13_yaml_20"></a>1.3 yaml实例</h3>
<p>查看k8s版本</p>
<pre><div class="hljs"><code class="lang-shell">kubectl api-versions
</code></div></pre>
<p>查看资源类型</p>
<pre><div class="hljs"><code class="lang-shell">kubectl api-resources
</code></div></pre>
<pre><div class="hljs"><code class="lang-yaml"><span class="hljs-attr">apiVersion:</span> <span class="hljs-string">apps/v1</span> <span class="hljs-comment"># API版本</span>
<span class="hljs-attr">kind:</span> <span class="hljs-string">Deployment</span> <span class="hljs-comment"># 资源类型</span>
<span class="hljs-attr">metedata:</span> <span class="hljs-comment"># 资源元数据</span>
<span class="hljs-string">name:nginx-deployment</span>
<span class="hljs-attr">namespace:</span> <span class="hljs-string">default</span>
<span class="hljs-attr">spec:</span> <span class="hljs-comment"># 资源规格</span>
<span class="hljs-attr">replicas:</span> <span class="hljs-number">3</span> <span class="hljs-comment"># 副本数量</span>
<span class="hljs-attr">selector:</span> <span class="hljs-comment"># 标签选择器</span>
<span class="hljs-attr">matchLabels:</span>
<span class="hljs-attr">app:</span> <span class="hljs-string">nginx</span>
<span class="hljs-attr">template:</span> <span class="hljs-comment"># Pod模板</span>
<span class="hljs-attr">metadata:</span> <span class="hljs-comment"># Pod元数据</span>
<span class="hljs-attr">labels:</span>
<span class="hljs-attr">app:</span> <span class="hljs-string">nginx</span>
<span class="hljs-attr">spec:</span> <span class="hljs-comment"># Pod规格</span>
<span class="hljs-attr">containers:</span> <span class="hljs-comment"># 容器配置</span>
<span class="hljs-bullet">-</span> <span class="hljs-attr">name:</span> <span class="hljs-string">nginx</span>
<span class="hljs-attr">image:</span> <span class="hljs-string">nginx:latest</span>
<span class="hljs-attr">port:</span>
<span class="hljs-bullet">-</span> <span class="hljs-attr">containerPort:</span> <span class="hljs-number">80</span>
</code></div></pre>
<p><img src="https://www.couragesteak.com/tcos/article/933fc0393f3b9f2b2c6b1e98c09fb9b8.png" alt="" /></p>
<p><code>apiVersion</code>:API版本<br />
<code>kind</code>:资源类型<br />
<code>metadata</code>:资源元数据<br />
<code>spec</code>:资源规格<br />
<code>replicas</code>:副本数量<br />
<code>selector</code>:标签选择器<br />
<code>template</code>:Pod模板<br />
<code>metadata</code>:Pod元数据<br />
<code>spec</code>:Pod规格<br />
<code>容器配置</code>:容器配置</p>
<h2><a id="2_yaml_70"></a>2 yaml文件快速编写</h2>
<h3><a id="21_kubectl_create_72"></a>2.1 <code>kubectl create</code>命令生成</h3>
<p>资源未部署,可以使用</p>
<p><strong>1、创建资源 my-nginx</strong></p>
<pre><div class="hljs"><code class="lang-shell">kubectl create deployment my-nginx
</code></div></pre>
<p><strong>2、将创建my-nginx资源过程用yaml生成</strong><br />
基于上一步</p>
<pre><div class="hljs"><code class="lang-shell">kubectl create deployment my-nginx --image=nginx -o yaml
</code></div></pre>
<p><strong>3、尝试运行,但并不真运行</strong><br />
基于上一步</p>
<pre><div class="hljs"><code class="lang-shell">kubectl create deployment my-nginx --image=nginx -o yaml --dry-run
</code></div></pre>
<p><strong>3、生成yaml,并保存到文件</strong><br />
基于上一步</p>
<pre><div class="hljs"><code class="lang-shell">kubectl create deployment my-nginx --image=nginx -o yaml --dry-run > my-nginx.yaml
</code></div></pre>
<p>然后根据实际,修改里面的内容
评论区