1 简介
官网:https://dolphinscheduler.apache.org/zh-cn/
文档:https://dolphinscheduler.apache.org/zh-cn/docs/
https://dolphinscheduler.apache.org/zh-cn/docs/2.0.5/user_doc/guide/flink-call.html
Apache DolphinScheduler是一个分布式 易扩展的可视化工作流任务调度平台,致力于解决数据处理流程中错综复杂的关系,使调度系统在数据处理流程中开箱即用。
版本:2.0.5
1.1 特性
- 简单易用:DAG监控界面,所有流程定义都是可视化,通过拖拽任务完成定制DAG,通过API方式与第三方系统集成,一键部署。
- 高可靠性:去中心化的多Master和多Worker服务对等架构,避免单Master压力过大,另外采用任务缓冲队列来避免过载。
- 高扩展性:支持自定义任务类型,调度器使用分布式调度,调度能力随集群线性增长,Master和Worker支持动态上下线。
- 丰富的使用场景:支持多租户,支持暂停恢复操作,紧密贴合大数据生态,提供Spark、Hive、MapRedece、Python、Sub_process、Shell等近20中任务类型。
1.2 核心架构(主要角色)
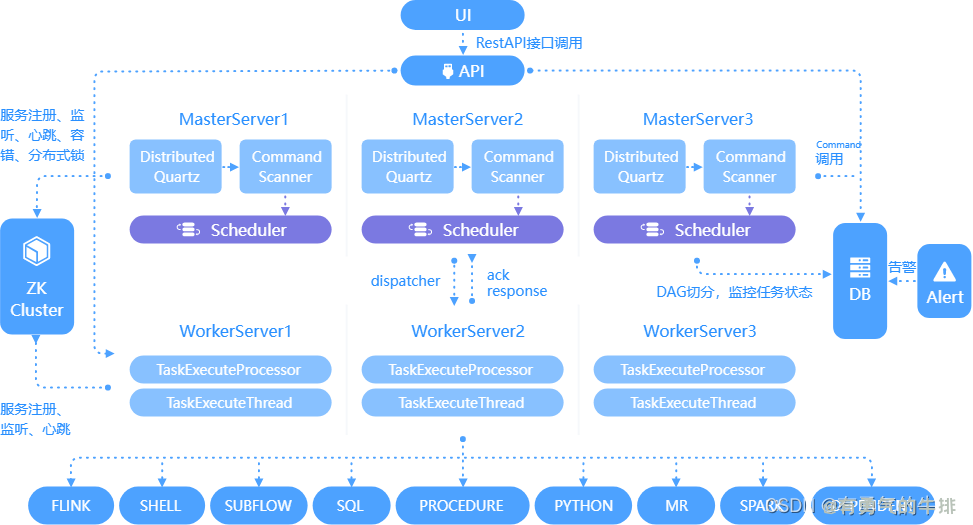
- MasterServer:采用分布式务中心设计理念,MasterServer主要负责DAG任务切分,任务提交、任务监控,并同时监听其他MasterServer和WorkerServer的健康状态。(负责工作流)
- WorkerServer:也采用分布式务中心设计理念,WorkerServer主要负责任务的执行和提供日志服务。(负责任务)
- ZooKeeper:系统中MasterServer和WorkerServer节点都通过ZooKeeper来进行集群管理和容错。
- Alert服务:提供告警相关服务。
- API接口层:主要负责处理前端UI层的请求。
- UI:系统的前端页面,提供系统的各种可视化操作界面。
2 部署说明
2.1 软硬件要求
操作系统要求
| 操作系统 |
版本 |
| Red Hat Enterprise Linux |
>=7.0 |
| CentOS |
>=7.0 |
| Oracle Enterprise Linux |
>=7.0 |
| Ubuntu LTS |
>=16.04 |
服务器硬件要求
| CPU |
内存 |
硬盘类型 |
网络 |
实例数量 |
| 4核+ |
8GB+ |
SAS |
千兆网卡 |
1+ |
2.2 部署模式
2.2.1 单机模式
单机模式(sandalone)模式下,所有服务均集中于一个StandaloneServer进程中,并且其中内置了注册中心ZooKeeper和数据库H2。只需配置JDK环境,即可一键启动DolphinScheduler。(学习、测试)
2.2.2 伪集群模式
伪集群模式(Pseudo-Cluster)是单台机器部署DolphinSchdeuler各项服务,该模式下master、worker、api server、logger server等服务都只在同一台机器上。ZooKeeper和数据库需要单独安装并进行响应配置。
2.2.3 集群模式
相对于伪集群,区别在于可以在多台机器部署 DolphinScheduler各项服务,并且Maser、Worker等服务可配置多个。
3 集群搭建
下载:https://dlcdn.apache.org/dolphinscheduler/2.0.5/
3.1 环境准备
3.1.1 硬件
Master:通常2~3个
Worker:多个
这里配置一个Master、三个Worker
| 名称 |
IP |
角色 |
| master |
192.168.56.20 |
master、worker |
| slave1 |
192.168.56.21 |
worker |
| slave2 |
192.168.56.22 |
worker |
3.1.2 软件
- 三台阶段均需安装JDK(1.8+),并配置相关环境变量。
- 需部署数据库,支持MySQL(5.7+)或者PostgreSQL(8.2.15+)
- 需部署Zookeeper(3.4.6+)
- 三台节点均需安装进程树分析工具psmisc
sudo yum install -y psmisc
本次环境:
JAVA:V1.8.0_151
ZooKeeper:V3.7.1
驱动:
mysql-connector-java-8.0.16.jar
3.2 创建元数据库及用户
安装docker:https://blog.csdn.net/zx77588023/article/details/122652560
docker run -d \
-p 3306:3306 \
-v /usr/local/mysql/data/conf:/etc/mysql/conf.d \
-v /usr/local/mysql/data/data:/var/lib/mysql \
-e MYSQL_ROOT_PASSWORD=root \
--name ds_mysql mysql:5.7
登录mysql
mysql -u root -p
1、创建数据库
CREATE DATABASE dolphinscheduler DEFAULT CHARACTER SET utf8 DEFAULT COLLATE utf8_general_ci;
2、创建用户
CREATE USER 'dolphinscheduler'@'%' IDENTIFIED BY 'dolphinscheduler';
如果测试使用,提供密码过于简单,可以降低密码强度级别
set global validate_password_length=4;
set global validate_password_policy=0;
3、赋予用户响应权限
GRANT ALL PRIVILEGES ON dolphinscheduler.* TO 'dolphinscheduler'@'%';
flush privileges;
3.3 初始化数据库
1、拷贝MySQL驱动到DolphinScheduler的解压目录lib中,要求版本:JDBC Driver 8.0.16
cp mysql-connector-java-8.0.16.jar /usr/local/ds/apache-dolphinscheduler-2.0.5-bin/lib
2、执行数据库初始化脚本
cd /usr/local/ds/apache-dolphinscheduler-2.0.5-bin
./script/create-dolphinscheduler.sh
3.4 配置一键部署脚本
三台机器均配置免密超级用户 charles
useradd charles -u 520
sudo vim /etc/sudoers
charles ALL=(ALL) NOPASSWD:ALL
# 创建用户需使用 root 登录
useradd dolphinscheduler

# 添加密码
echo "dolphinscheduler" | passwd --stdin dolphinscheduler

# 配置 sudo 免密
sed -i '$adolphinscheduler  ALL=(ALL)  NOPASSWD: NOPASSWD: ALL' /etc/sudoers
sed -i 's/Defaults    requirett/#Defaults    requirett/g' /etc/sudoers

# 修改目录权限,使得部署用户对二进制包解压后的 apache-dolphinscheduler-*-bin 目录有操作权限
chown -R dolphinscheduler:dolphinscheduler apache-dolphinscheduler-*-bin
修改 conf/config目录下得install_config.conf文件
vim conf/config/install_config.conf
# Licensed to the Apache Software Foundation (ASF) under one or more
# contributor license agreements. See the NOTICE file distributed with
# this work for additional information regarding copyright ownership.
# The ASF licenses this file to You under the Apache License, Version 2.0
# (the "License"); you may not use this file except in compliance with
# the License. You may obtain a copy of the License at
#
#
# distributed under the License is distributed on an "AS IS" BASIS,
# WITHOUT WARRANTIES OR CONDITIONS OF ANY KIND, either express or implied.
# See the License for the specific language governing permissions and
# limitations under the License.
#
# ---------------------------------------------------------
# INSTALL MACHINE
# ---------------------------------------------------------
# A comma separated list of machine hostname or IP would be installed DolphinScheduler,
# including master, worker, api, alert. If you want to deploy in pseudo-distributed
# mode, just write a pseudo-distributed hostname
# Example for hostnames: ips="ds1,ds2,ds3,ds4,ds5", Example for IPs: ips="192.168.8.1,192.168.8.2,192.168.8.3,192.168.8.4,192.168.8.5"
# 将要部署的任一 DolpinScheduler 服务的主机名或ip列表
ips="master,slave1,slave2"
# Port of SSH protocol, default value is 22. For now we only support same port in all `ips` machine
# modify it if you use different ssh port
sshPort="22"
# A comma separated list of machine hostname or IP would be installed Master server, it
# must be a subset of configuration `ips`.
# Example for hostnames: masters="ds1,ds2", Example for IPs: masters="192.168.8.1,192.168.8.2"
# master所在主机名列表,必须是 ips 的子集
masters="master"
# A comma separated list of machine <hostname>:<workerGroup> or <IP>:<workerGroup>.All hostname or IP must be a
# subset of configuration `ips`, And workerGroup have default value as `default`, but we recommend you declare behind the hosts
# Example for hostnames: workers="ds1:default,ds2:default,ds3:default", Example for IPs: workers="192.168.8.1:default,192.168.8.2:default,192.168.8.3:default"
# work 主机名及队列,此处的ip 必须在 ips 列表中
workers="master:default,slave1:default,slave2:default"
# A comma separated list of machine hostname or IP would be installed Alert server, it
# must be a subset of configuration `ips`.
# Example for hostname: alertServer="ds3", Example for IP: alertServer="192.168.8.3"
# 告警服务所在服务器主机名
alertServer="slave1"
# A comma separated list of machine hostname or IP would be installed API server, it
# must be a subset of configuration `ips`.
# Example for hostname: apiServers="ds1", Example for IP: apiServers="192.168.8.1"
# api 服务所在服务器主机名
apiServers="slave1"
# A comma separated list of machine hostname or IP would be installed Python gateway server, it
# must be a subset of configuration `ips`.
# Example for hostname: pythonGatewayServers="ds1", Example for IP: pythonGatewayServers="192.168.8.1"
# 不需要的配置项,可以保留默认值,也可以
#pythonGatewayServers="ds1"
# The directory to install DolphinScheduler for all machine we config above. It will automatically be created by `install.sh` script if not exists.
# Do not set this configuration same as the current path (pwd)
# 安装路径
installPath="/usr/local/ds/ds_install"
# The user to deploy DolphinScheduler for all machine we config above. For now user must create by yourself before running `install.sh`
# script. The user needs to have sudo privileges and permissions to operate hdfs. If hdfs is enabled than the root directory needs
# to be created by this user
# 部署用户 具有sudo权限,配置免密
deployUser="charles"
#deployUser="root"
# The directory to store local data for all machine we config above. Make sure user `deployUser` have permissions to read and write this directory.
# 临时路径
dataBasedirPath="/tmp/dolphinscheduler"
# ---------------------------------------------------------
# DolphinScheduler ENV
# ---------------------------------------------------------
# JAVA_HOME, we recommend use same JAVA_HOME in all machine you going to install DolphinScheduler
# and this configuration only support one parameter so far.
javaHome="/usr/local/jdk1.8.0_151"
# DolphinScheduler API service port, also this is your DolphinScheduler UI component's URL port, default value is 12345
apiServerPort="12345"
# ---------------------------------------------------------
# Database
# NOTICE: If database value has special characters, such as `.*[]^${}\+?|()@#&`, Please add prefix `\` for escaping.
# ---------------------------------------------------------
# The type for the metadata database
# Supported values: ``postgresql``, ``mysql`, `h2``.
# 数据库类型
DATABASE_TYPE="mysql"
# string jdbc:mysql://127.0.0.1:3306/dolphinscheduler?useUnicode=true&characterEncoding=UTF-8 as example
SPRING_DATASOURCE_URL="jdbc:mysql://master:3306/dolphinscheduler?useUnicode=true&characterEncoding=UTF-8"
# 数据库用户名
SPRING_DATASOURCE_USERNAME="dolphinscheduler"
# 数据库密码
SPRING_DATASOURCE_PASSWORD="dolphinscheduler"
# ---------------------------------------------------------
# Registry Server(这里配置zookeeper)
# ---------------------------------------------------------
# Registry Server plugin name, should be a substring of `registryPluginDir`, DolphinScheduler use this for verifying configuration consistency
registryPluginName="zookeeper"
# Registry Server address.
registryServers="master:2181,slave1:2181,slave2:2181"
# Registry Namespace(注册中心命名空间)
registryNamespace="dolphinscheduler"
# ---------------------------------------------------------
# Worker Task Server
# ---------------------------------------------------------
# Worker Task Server plugin dir. DolphinScheduler will find and load the worker task plugin jar package from this dir.
taskPluginDir="lib/plugin/task"
# resource storage type: HDFS, S3, NONE(资源中心,比存储MR中使用的jar包)
resourceStorageType="HDFS" # 这里我们存储在HDFS中
# resource store on HDFS/S3 path, resource file will store to this hdfs path, self configuration, please make sure the directory exists on hdfs and has read write permissions. "/dolphinscheduler" is recommended
# 存储资源的根目录
resourceUploadPath="/dolphinscheduler"
# if resourceStorageType is HDFS,defaultFS write namenode address,HA, you need to put core-site.xml and hdfs-site.xml in the conf directory.
# if S3,write S3 address,HA,for example :s3a://dolphinscheduler,
# Note,S3 be sure to create the root directory /dolphinscheduler
# 默认FS得知(我们用hadoop的)
defaultFS="hdfs://master:9000"
# if resourceStorageType is S3, the following three configuration is required, otherwise please ignore
s3Endpoint="http://192.168.xx.xx:9010"
s3AccessKey="xxxxxxxxxx"
s3SecretKey="xxxxxxxxxx"
# resourcemanager port, the default value is 8088 if not specified
resourceManagerHttpAddressPort="8088"
# if resourcemanager HA is enabled, please set the HA IPs; if resourcemanager is single node, keep this value empty
# 启用了HA
yarnHaIps=""
# if resourcemanager HA is enabled or not use resourcemanager, please keep the default value; If resourcemanager is single node, you only need to replace 'yarnIp1' to actual resourcemanager hostname
# 未启用HA
singleYarnIp="master"
# who has permission to create directory under HDFS/S3 root path
# Note: if kerberos is enabled, please config hdfsRootUser=
hdfsRootUser="hdfs"
# kerberos config
# whether kerberos starts, if kerberos starts, following four items need to config, otherwise please ignore
# hdfs超级用户(谁启动的)
kerberosStartUp="false"
# kdc krb5 config file path
krb5ConfPath="$installPath/conf/krb5.conf"
# keytab username,watch out the @ sign should followd by \\
keytabUserName="hdfs-mycluster\\@ESZ.COM"
# username keytab path
keytabPath="$installPath/conf/hdfs.headless.keytab"
# kerberos expire time, the unit is hour
kerberosExpireTime="2"
# use sudo or not
sudoEnable="true"
# worker tenant auto create
workerTenantAutoCreate="true"
3.5 一键部署 DolpinScheduler
1、启动 Zookeeper 集群
zh.sh start
2、一键部署并启动DolphinScheduler
./install.sh
3、查看 DolphinScheduler进程
jps
4、访问DophinScheduler UI
http://192.168.56.21:12345/dolphinscheduler
初始用户名:admin
初始密码:dolphinscheduler123

3.6 DolphinScheduler启停命令
进入到安装目录 cd /usr/local/ds/ds_install
1、一键启停所有服务
./bin/start-all.sh
./bin/stop-all.sh
2、启停 Master
./dolphinscheduler-daemon.sh start master-server
./dolphinscheduler-daemon.sh stop master-server
3、启停 Worker
./dolphinscheduler-daemon.sh start worker-server
./dolphinscheduler-daemon.sh stop worker-server
4、启停 Api
./dolphinscheduler-daemon.sh start api-server
./dolphinscheduler-daemon.sh stop api-server
5、启停 Logger
./dolphinscheduler-daemon.sh start logger-server
./dolphinscheduler-daemon.sh stop logger-server
4 DolphinScheduler入门
4.1 安全中心配置
4.1.1 Yarn队列管理
队列是在执行spark、mapreduce等程序,需要用到“队列”参数时使用的。
此处的队列对应的是Yarn调度器资源队列。故队列概念只对泡在Yarn上的任务类型有效。此处创建出的队列,可供后续任务进行选择。需要注意的是,在DolphinSheduler中创建队列,并不会影响到Yarn调度器的队列配置。
4.1.2 租户管理
租户对应的是 Linux的用户,用于worker提交作业所使用的用户。如果 linux 没有这个用户,默认情况下回导致任务运行失败。可以通过修改 worker.properties 配置文件中参数 worker.tenant.auto.create=true(默认值为flase)实现当linux用户不存在时自动创建该用户。
worker.tenant.auto.create=true 参数会要求 worker 可以免密运行 sudo 命令。
vim /usr/local/ds/ds_install/conf/worker.properties
报错处理:
org.apache.dolphinscheduler.registry.api.RegistryException: zookeeper connect timeout
vim registry.properties
registry.connection.timeout.ms=75000
org.apache.dolphinscheduler.api.exceptions.ApiExceptionHandler:[46] - 创建租户错误
查看
vim /usr/local/hadoop-2.8.4/etc/hadoop/core-site.xml
<!--配置hdfs默认的命名-->
<property>
	<name>fs.defaultFS</name>
	<value>hdfs://master:9000</value>
</property>
资源存储类型:HDFS,S3,NONE,修改 install_config.conf
如果resourceStorageType是HDFS,defaultFS写入namenode地址,HA需要把core-site.xml和hdfs-site.xml放到conf目录下。
如果是S3,写S3地址,HA,例如:s3a://dolphinscheduler,
注意,s3一定要创建根目录/dolphinscheduler
org.apache.hadoop.ipc.RemoteException: Permission denied: user=hdfs, access=WRITE, inode="/":root:supergroup:drwxr-xr-x
org.apache.hadoop.security.AccessControlException: Permission denied: user=hdfs, access=WRITE, inode="/":root:supergroup:drwxr-xr-x
对非CDH用户
vim /usr/local/hadoop-2.8.4/etc/hadoop/hdfs-site.xml
<!--是否启用hdfs的权限-->
<property>
    <name>dfs.permissions</name>
    <value>false</value>
</property>
参考地址:
https://blog.csdn.net/g11d111/article/details/72902112
参考地址:
https://www.bilibili.com/video/BV1sa411x7Ep
https://github.com/apache/dolphinscheduler/issues/4389
<h2><a id="1__0"></a>1 简介</h2>
<p>官网:<a href="https://dolphinscheduler.apache.org/zh-cn/" target="_blank">https://dolphinscheduler.apache.org/zh-cn/</a></p>
<p>文档:<a href="https://dolphinscheduler.apache.org/zh-cn/docs/" target="_blank">https://dolphinscheduler.apache.org/zh-cn/docs/</a></p>
<p><a href="https://dolphinscheduler.apache.org/zh-cn/docs/2.0.5/user_doc/guide/flink-call.html" target="_blank">https://dolphinscheduler.apache.org/zh-cn/docs/2.0.5/user_doc/guide/flink-call.html</a></p>
<p>Apache DolphinScheduler是一个<code>分布式</code> <code>易扩展</code>的<code>可视化</code>工作流任务调度平台,致力于解决数据处理流程中错综复杂的关系,使调度系统在数据处理流程中开箱即用。</p>
<p>版本:2.0.5</p>
<h3><a id="11__12"></a>1.1 特性</h3>
<ul>
<li><strong>简单易用</strong>:DAG监控界面,所有流程定义都是可视化,通过拖拽任务完成定制DAG,通过API方式与第三方系统集成,一键部署。</li>
<li><strong>高可靠性</strong>:去中心化的多Master和多Worker服务对等架构,避免单Master压力过大,另外采用任务缓冲队列来避免过载。</li>
<li><strong>高扩展性</strong>:支持自定义任务类型,调度器使用分布式调度,调度能力随集群线性增长,Master和Worker支持动态上下线。</li>
<li><strong>丰富的使用场景</strong>:支持多租户,支持暂停恢复操作,紧密贴合大数据生态,提供Spark、Hive、MapRedece、Python、Sub_process、Shell等近20中任务类型。</li>
</ul>
<h3><a id="12__19"></a>1.2 核心架构(主要角色)</h3>
<ul>
<li><strong>MasterServer</strong>:采用分布式务中心设计理念,MasterServer主要负责DAG任务切分,任务提交、任务监控,并同时监听其他MasterServer和WorkerServer的健康状态。(负责工作流)</li>
<li>WorkerServer:也采用分布式务中心设计理念,WorkerServer主要负责任务的执行和提供日志服务。(负责任务)</li>
<li>ZooKeeper:系统中MasterServer和WorkerServer节点都通过ZooKeeper来进行集群管理和容错。</li>
<li>Alert服务:提供告警相关服务。</li>
<li>API接口层:主要负责处理前端UI层的请求。</li>
<li>UI:系统的前端页面,提供系统的各种可视化操作界面。</li>
</ul>
<p><img src="https://www.couragesteak.com/tcos/article/b706f418d8bfc4556a46ee3dee5afc8c.png" alt="" /></p>
<h2><a id="2__32"></a>2 部署说明</h2>
<h3><a id="21__34"></a>2.1 软硬件要求</h3>
<p>操作系统要求</p>
<table>
<thead>
<tr>
<th>操作系统</th>
<th>版本</th>
</tr>
</thead>
<tbody>
<tr>
<td>Red Hat Enterprise Linux</td>
<td>>=7.0</td>
</tr>
<tr>
<td>CentOS</td>
<td>>=7.0</td>
</tr>
<tr>
<td>Oracle Enterprise Linux</td>
<td>>=7.0</td>
</tr>
<tr>
<td>Ubuntu LTS</td>
<td>>=16.04</td>
</tr>
</tbody>
</table>
<p>服务器硬件要求</p>
<table>
<thead>
<tr>
<th>CPU</th>
<th>内存</th>
<th>硬盘类型</th>
<th>网络</th>
<th>实例数量</th>
</tr>
</thead>
<tbody>
<tr>
<td>4核+</td>
<td>8GB+</td>
<td>SAS</td>
<td>千兆网卡</td>
<td>1+</td>
</tr>
</tbody>
</table>
<h3><a id="22__53"></a>2.2 部署模式</h3>
<h4><a id="221__55"></a>2.2.1 单机模式</h4>
<p>单机模式(sandalone)模式下,所有服务均集中于一个StandaloneServer进程中,并且其中内置了注册中心ZooKeeper和数据库H2。只需配置JDK环境,即可一键启动DolphinScheduler。(学习、测试)</p>
<h4><a id="222__59"></a>2.2.2 伪集群模式</h4>
<p>伪集群模式(Pseudo-Cluster)是单台机器部署DolphinSchdeuler各项服务,该模式下master、worker、api server、logger server等服务都只在同一台机器上。ZooKeeper和数据库需要单独安装并进行响应配置。</p>
<h4><a id="223__63"></a>2.2.3 集群模式</h4>
<p>相对于伪集群,区别在于可以在多台机器部署 DolphinScheduler各项服务,并且Maser、Worker等服务可配置多个。</p>
<h2><a id="3__67"></a>3 集群搭建</h2>
<p>下载:<a href="https://dlcdn.apache.org/dolphinscheduler/2.0.5/" target="_blank">https://dlcdn.apache.org/dolphinscheduler/2.0.5/</a></p>
<h3><a id="31__71"></a>3.1 环境准备</h3>
<h4><a id="311__73"></a>3.1.1 硬件</h4>
<p>Master:通常2~3个<br />
Worker:多个</p>
<p>这里配置一个Master、三个Worker</p>
<table>
<thead>
<tr>
<th>名称</th>
<th>IP</th>
<th>角色</th>
</tr>
</thead>
<tbody>
<tr>
<td>master</td>
<td>192.168.56.20</td>
<td>master、worker</td>
</tr>
<tr>
<td>slave1</td>
<td>192.168.56.21</td>
<td>worker</td>
</tr>
<tr>
<td>slave2</td>
<td>192.168.56.22</td>
<td>worker</td>
</tr>
</tbody>
</table>
<h4><a id="312___86"></a>3.1.2 软件</h4>
<ol>
<li>三台阶段均需安装JDK(1.8+),并配置相关环境变量。</li>
<li>需部署数据库,支持MySQL(5.7+)或者PostgreSQL(8.2.15+)</li>
<li>需部署Zookeeper(3.4.6+)</li>
<li>三台节点均需安装进程树分析工具psmisc</li>
</ol>
<pre><div class="hljs"><code class="lang-shell">sudo yum install -y psmisc
</code></div></pre>
<p>本次环境:<br />
JAVA:V1.8.0_151<br />
ZooKeeper:V3.7.1<br />
驱动:<br />
mysql-connector-java-8.0.16.jar</p>
<h3><a id="32__103"></a>3.2 创建元数据库及用户</h3>
<p>安装docker:<a href="https://blog.csdn.net/zx77588023/article/details/122652560" target="_blank">https://blog.csdn.net/zx77588023/article/details/122652560</a></p>
<pre><div class="hljs"><code class="lang-shell">docker run -d \
-p 3306:3306 \
-v /usr/local/mysql/data/conf:/etc/mysql/conf.d \
-v /usr/local/mysql/data/data:/var/lib/mysql \
-e MYSQL_ROOT_PASSWORD=root \
--name ds_mysql mysql:5.7
</code></div></pre>
<p>登录mysql</p>
<pre><div class="hljs"><code class="lang-sql">mysql <span class="hljs-operator">-</span>u root <span class="hljs-operator">-</span>p
</code></div></pre>
<p>1、创建数据库</p>
<pre><div class="hljs"><code class="lang-sql"><span class="hljs-keyword">CREATE</span> DATABASE dolphinscheduler <span class="hljs-keyword">DEFAULT</span> <span class="hljs-type">CHARACTER</span> <span class="hljs-keyword">SET</span> utf8 <span class="hljs-keyword">DEFAULT</span> <span class="hljs-keyword">COLLATE</span> utf8_general_ci;
</code></div></pre>
<p>2、创建用户</p>
<pre><div class="hljs"><code class="lang-sql"><span class="hljs-keyword">CREATE</span> <span class="hljs-keyword">USER</span> <span class="hljs-string">'dolphinscheduler'</span>@<span class="hljs-string">'%'</span> IDENTIFIED <span class="hljs-keyword">BY</span> <span class="hljs-string">'dolphinscheduler'</span>;
</code></div></pre>
<p>如果测试使用,提供密码过于简单,可以降低密码强度级别</p>
<pre><div class="hljs"><code class="lang-sql"><span class="hljs-keyword">set</span> <span class="hljs-keyword">global</span> validate_password_length<span class="hljs-operator">=</span><span class="hljs-number">4</span>;
<span class="hljs-keyword">set</span> <span class="hljs-keyword">global</span> validate_password_policy<span class="hljs-operator">=</span><span class="hljs-number">0</span>;
</code></div></pre>
<p>3、赋予用户响应权限</p>
<pre><div class="hljs"><code class="lang-sql"><span class="hljs-keyword">GRANT</span> <span class="hljs-keyword">ALL</span> PRIVILEGES <span class="hljs-keyword">ON</span> dolphinscheduler.<span class="hljs-operator">*</span> <span class="hljs-keyword">TO</span> <span class="hljs-string">'dolphinscheduler'</span>@<span class="hljs-string">'%'</span>;
</code></div></pre>
<pre><div class="hljs"><code class="lang-sql">flush privileges;
</code></div></pre>
<h3><a id="33__151"></a>3.3 初始化数据库</h3>
<p>1、拷贝MySQL驱动到DolphinScheduler的解压目录lib中,要求版本:JDBC Driver 8.0.16</p>
<pre><div class="hljs"><code class="lang-shell">cp mysql-connector-java-8.0.16.jar /usr/local/ds/apache-dolphinscheduler-2.0.5-bin/lib
</code></div></pre>
<p>2、执行数据库初始化脚本</p>
<pre><div class="hljs"><code class="lang-shell">cd /usr/local/ds/apache-dolphinscheduler-2.0.5-bin
./script/create-dolphinscheduler.sh
</code></div></pre>
<h3><a id="34__166"></a>3.4 配置一键部署脚本</h3>
<p>三台机器均配置<code>免密</code>超级用户 <code>charles</code></p>
<pre><div class="hljs"><code class="lang-shell">useradd charles -u 520
</code></div></pre>
<pre><div class="hljs"><code class="lang-shell">sudo vim /etc/sudoers
</code></div></pre>
<pre><div class="hljs"><code class="lang-shell">charles ALL=(ALL) NOPASSWD:ALL
</code></div></pre>
<pre><div class="hljs"><code class="lang-shell"><span class="hljs-meta"># </span><span class="language-bash">创建用户需使用 root 登录</span>
useradd dolphinscheduler
<span class="hljs-meta">
# </span><span class="language-bash">添加密码</span>
echo "dolphinscheduler" | passwd --stdin dolphinscheduler
<span class="hljs-meta">
# </span><span class="language-bash">配置 sudo 免密</span>
sed -i '$adolphinscheduler ALL=(ALL) NOPASSWD: NOPASSWD: ALL' /etc/sudoers
sed -i 's/Defaults requirett/#Defaults requirett/g' /etc/sudoers
<span class="hljs-meta">
# </span><span class="language-bash">修改目录权限,使得部署用户对二进制包解压后的 apache-dolphinscheduler-*-bin 目录有操作权限</span>
chown -R dolphinscheduler:dolphinscheduler apache-dolphinscheduler-*-bin
</code></div></pre>
<p>修改 <code>conf/config</code>目录下得<code>install_config.conf</code>文件</p>
<pre><div class="hljs"><code class="lang-shell">vim conf/config/install_config.conf
</code></div></pre>
<pre><div class="hljs"><code class="lang-shell"><span class="hljs-meta"># </span><span class="language-bash">Licensed to the Apache Software Foundation (ASF) under one or more</span>
<span class="hljs-meta"># </span><span class="language-bash">contributor license agreements. See the NOTICE file distributed with</span>
<span class="hljs-meta"># </span><span class="language-bash">this work <span class="hljs-keyword">for</span> additional information regarding copyright ownership.</span>
<span class="hljs-meta"># </span><span class="language-bash">The ASF licenses this file to You under the Apache License, Version 2.0</span>
<span class="hljs-meta"># </span><span class="language-bash">(the <span class="hljs-string">"License"</span>); you may not use this file except <span class="hljs-keyword">in</span> compliance with</span>
<span class="hljs-meta"># </span><span class="language-bash">the License. You may obtain a copy of the License at</span>
<span class="hljs-meta">#</span><span class="language-bash">
<span class="hljs-comment"># http://www.apache.org/licenses/LICENSE-2.0</span></span>
<span class="hljs-meta">#</span><span class="language-bash">
<span class="hljs-comment"># Unless required by applicable law or agreed to in writing, software</span></span>
<span class="hljs-meta"># </span><span class="language-bash">distributed under the License is distributed on an <span class="hljs-string">"AS IS"</span> BASIS,</span>
<span class="hljs-meta"># </span><span class="language-bash">WITHOUT WARRANTIES OR CONDITIONS OF ANY KIND, either express or implied.</span>
<span class="hljs-meta"># </span><span class="language-bash">See the License <span class="hljs-keyword">for</span> the specific language governing permissions and</span>
<span class="hljs-meta"># </span><span class="language-bash">limitations under the License.</span>
<span class="hljs-meta">#</span><span class="language-bash">
</span><span class="hljs-meta">
# </span><span class="language-bash">---------------------------------------------------------</span>
<span class="hljs-meta"># </span><span class="language-bash">INSTALL MACHINE</span>
<span class="hljs-meta"># </span><span class="language-bash">---------------------------------------------------------</span>
<span class="hljs-meta"># </span><span class="language-bash">A comma separated list of machine hostname or IP would be installed DolphinScheduler,</span>
<span class="hljs-meta"># </span><span class="language-bash">including master, worker, api, alert. If you want to deploy <span class="hljs-keyword">in</span> pseudo-distributed</span>
<span class="hljs-meta"># </span><span class="language-bash">mode, just write a pseudo-distributed hostname</span>
<span class="hljs-meta"># </span><span class="language-bash">Example <span class="hljs-keyword">for</span> hostnames: ips=<span class="hljs-string">"ds1,ds2,ds3,ds4,ds5"</span>, Example <span class="hljs-keyword">for</span> IPs: ips=<span class="hljs-string">"192.168.8.1,192.168.8.2,192.168.8.3,192.168.8.4,192.168.8.5"</span></span>
<span class="hljs-meta"># </span><span class="language-bash">将要部署的任一 DolpinScheduler 服务的主机名或ip列表</span>
ips="master,slave1,slave2"
<span class="hljs-meta">
# </span><span class="language-bash">Port of SSH protocol, default value is 22. For now we only support same port <span class="hljs-keyword">in</span> all `ips` machine</span>
<span class="hljs-meta"># </span><span class="language-bash">modify it <span class="hljs-keyword">if</span> you use different ssh port</span>
sshPort="22"
<span class="hljs-meta">
# </span><span class="language-bash">A comma separated list of machine hostname or IP would be installed Master server, it</span>
<span class="hljs-meta"># </span><span class="language-bash">must be a subset of configuration `ips`.</span>
<span class="hljs-meta"># </span><span class="language-bash">Example <span class="hljs-keyword">for</span> hostnames: masters=<span class="hljs-string">"ds1,ds2"</span>, Example <span class="hljs-keyword">for</span> IPs: masters=<span class="hljs-string">"192.168.8.1,192.168.8.2"</span></span>
<span class="hljs-meta"># </span><span class="language-bash">master所在主机名列表,必须是 ips 的子集</span>
masters="master"
<span class="hljs-meta">
# </span><span class="language-bash">A comma separated list of machine <hostname>:<workerGroup> or <IP>:<workerGroup>.All hostname or IP must be a</span>
<span class="hljs-meta"># </span><span class="language-bash">subset of configuration `ips`, And workerGroup have default value as `default`, but we recommend you <span class="hljs-built_in">declare</span> behind the hosts</span>
<span class="hljs-meta"># </span><span class="language-bash">Example <span class="hljs-keyword">for</span> hostnames: workers=<span class="hljs-string">"ds1:default,ds2:default,ds3:default"</span>, Example <span class="hljs-keyword">for</span> IPs: workers=<span class="hljs-string">"192.168.8.1:default,192.168.8.2:default,192.168.8.3:default"</span></span>
<span class="hljs-meta"># </span><span class="language-bash">work 主机名及队列,此处的ip 必须在 ips 列表中</span>
workers="master:default,slave1:default,slave2:default"
<span class="hljs-meta">
# </span><span class="language-bash">A comma separated list of machine hostname or IP would be installed Alert server, it</span>
<span class="hljs-meta"># </span><span class="language-bash">must be a subset of configuration `ips`.</span>
<span class="hljs-meta"># </span><span class="language-bash">Example <span class="hljs-keyword">for</span> hostname: alertServer=<span class="hljs-string">"ds3"</span>, Example <span class="hljs-keyword">for</span> IP: alertServer=<span class="hljs-string">"192.168.8.3"</span></span>
<span class="hljs-meta"># </span><span class="language-bash">告警服务所在服务器主机名</span>
alertServer="slave1"
<span class="hljs-meta">
# </span><span class="language-bash">A comma separated list of machine hostname or IP would be installed API server, it</span>
<span class="hljs-meta"># </span><span class="language-bash">must be a subset of configuration `ips`.</span>
<span class="hljs-meta"># </span><span class="language-bash">Example <span class="hljs-keyword">for</span> hostname: apiServers=<span class="hljs-string">"ds1"</span>, Example <span class="hljs-keyword">for</span> IP: apiServers=<span class="hljs-string">"192.168.8.1"</span></span>
<span class="hljs-meta"># </span><span class="language-bash">api 服务所在服务器主机名</span>
apiServers="slave1"
<span class="hljs-meta">
# </span><span class="language-bash">A comma separated list of machine hostname or IP would be installed Python gateway server, it</span>
<span class="hljs-meta"># </span><span class="language-bash">must be a subset of configuration `ips`.</span>
<span class="hljs-meta"># </span><span class="language-bash">Example <span class="hljs-keyword">for</span> hostname: pythonGatewayServers=<span class="hljs-string">"ds1"</span>, Example <span class="hljs-keyword">for</span> IP: pythonGatewayServers=<span class="hljs-string">"192.168.8.1"</span></span>
<span class="hljs-meta">
# </span><span class="language-bash">不需要的配置项,可以保留默认值,也可以 <span class="hljs-comment">#注释</span></span>
<span class="hljs-meta">#</span><span class="language-bash">pythonGatewayServers=<span class="hljs-string">"ds1"</span></span>
<span class="hljs-meta">
# </span><span class="language-bash">The directory to install DolphinScheduler <span class="hljs-keyword">for</span> all machine we config above. It will automatically be created by `install.sh` script <span class="hljs-keyword">if</span> not exists.</span>
<span class="hljs-meta"># </span><span class="language-bash">Do not <span class="hljs-built_in">set</span> this configuration same as the current path (<span class="hljs-built_in">pwd</span>)</span>
<span class="hljs-meta"># </span><span class="language-bash">安装路径</span>
installPath="/usr/local/ds/ds_install"
<span class="hljs-meta">
# </span><span class="language-bash">The user to deploy DolphinScheduler <span class="hljs-keyword">for</span> all machine we config above. For now user must create by yourself before running `install.sh`</span>
<span class="hljs-meta"># </span><span class="language-bash">script. The user needs to have sudo privileges and permissions to operate hdfs. If hdfs is enabled than the root directory needs</span>
<span class="hljs-meta"># </span><span class="language-bash">to be created by this user</span>
<span class="hljs-meta">
# </span><span class="language-bash">部署用户 具有sudo权限,配置免密</span>
deployUser="charles"
<span class="hljs-meta">#</span><span class="language-bash">deployUser=<span class="hljs-string">"root"</span></span>
<span class="hljs-meta">
# </span><span class="language-bash">The directory to store <span class="hljs-built_in">local</span> data <span class="hljs-keyword">for</span> all machine we config above. Make sure user `deployUser` have permissions to <span class="hljs-built_in">read</span> and write this directory.</span>
<span class="hljs-meta">
# </span><span class="language-bash">临时路径</span>
dataBasedirPath="/tmp/dolphinscheduler"
<span class="hljs-meta">
# </span><span class="language-bash">---------------------------------------------------------</span>
<span class="hljs-meta"># </span><span class="language-bash">DolphinScheduler ENV</span>
<span class="hljs-meta"># </span><span class="language-bash">---------------------------------------------------------</span>
<span class="hljs-meta"># </span><span class="language-bash">JAVA_HOME, we recommend use same JAVA_HOME <span class="hljs-keyword">in</span> all machine you going to install DolphinScheduler</span>
<span class="hljs-meta"># </span><span class="language-bash">and this configuration only support one parameter so far.</span>
javaHome="/usr/local/jdk1.8.0_151"
<span class="hljs-meta">
# </span><span class="language-bash">DolphinScheduler API service port, also this is your DolphinScheduler UI component<span class="hljs-string">'s URL port, default value is 12345</span></span>
apiServerPort="12345"
<span class="hljs-meta">
# </span><span class="language-bash"><span class="hljs-string">---------------------------------------------------------</span></span>
<span class="hljs-meta"># </span><span class="language-bash"><span class="hljs-string">Database</span></span>
<span class="hljs-meta"># </span><span class="language-bash"><span class="hljs-string">NOTICE: If database value has special characters, such as `.*[]^${}\+?|()@#&`, Please add prefix `\` for escaping.</span></span>
<span class="hljs-meta"># </span><span class="language-bash"><span class="hljs-string">---------------------------------------------------------</span></span>
<span class="hljs-meta"># </span><span class="language-bash"><span class="hljs-string">The type for the metadata database</span></span>
<span class="hljs-meta"># </span><span class="language-bash"><span class="hljs-string">Supported values: ``postgresql``, ``mysql`, `h2``.</span></span>
<span class="hljs-meta">
# </span><span class="language-bash"><span class="hljs-string">数据库类型</span></span>
DATABASE_TYPE="mysql"
<span class="hljs-meta">
# </span><span class="language-bash"><span class="hljs-string">string jdbc:mysql://127.0.0.1:3306/dolphinscheduler?useUnicode=true&characterEncoding=UTF-8 as example</span></span>
SPRING_DATASOURCE_URL="jdbc:mysql://master:3306/dolphinscheduler?useUnicode=true&characterEncoding=UTF-8"
<span class="hljs-meta">
# </span><span class="language-bash"><span class="hljs-string">数据库用户名</span></span>
SPRING_DATASOURCE_USERNAME="dolphinscheduler"
<span class="hljs-meta">
# </span><span class="language-bash"><span class="hljs-string">数据库密码</span></span>
SPRING_DATASOURCE_PASSWORD="dolphinscheduler"
<span class="hljs-meta">
# </span><span class="language-bash"><span class="hljs-string">---------------------------------------------------------</span></span>
<span class="hljs-meta"># </span><span class="language-bash"><span class="hljs-string">Registry Server(这里配置zookeeper)</span></span>
<span class="hljs-meta"># </span><span class="language-bash"><span class="hljs-string">---------------------------------------------------------</span></span>
<span class="hljs-meta"># </span><span class="language-bash"><span class="hljs-string">Registry Server plugin name, should be a substring of `registryPluginDir`, DolphinScheduler use this for verifying configuration consistency</span></span>
registryPluginName="zookeeper"
<span class="hljs-meta">
# </span><span class="language-bash"><span class="hljs-string">Registry Server address.</span></span>
registryServers="master:2181,slave1:2181,slave2:2181"
<span class="hljs-meta">
# </span><span class="language-bash"><span class="hljs-string">Registry Namespace(注册中心命名空间)</span></span>
registryNamespace="dolphinscheduler"
<span class="hljs-meta">
# </span><span class="language-bash"><span class="hljs-string">---------------------------------------------------------</span></span>
<span class="hljs-meta"># </span><span class="language-bash"><span class="hljs-string">Worker Task Server</span></span>
<span class="hljs-meta"># </span><span class="language-bash"><span class="hljs-string">---------------------------------------------------------</span></span>
<span class="hljs-meta"># </span><span class="language-bash"><span class="hljs-string">Worker Task Server plugin dir. DolphinScheduler will find and load the worker task plugin jar package from this dir.</span></span>
taskPluginDir="lib/plugin/task"
<span class="hljs-meta">
# </span><span class="language-bash"><span class="hljs-string">resource storage type: HDFS, S3, NONE(资源中心,比存储MR中使用的jar包)</span></span>
resourceStorageType="HDFS" # 这里我们存储在HDFS中
<span class="hljs-meta">
# </span><span class="language-bash"><span class="hljs-string">resource store on HDFS/S3 path, resource file will store to this hdfs path, self configuration, please make sure the directory exists on hdfs and has read write permissions. "/dolphinscheduler" is recommended</span></span>
<span class="hljs-meta"># </span><span class="language-bash"><span class="hljs-string">存储资源的根目录</span></span>
resourceUploadPath="/dolphinscheduler"
<span class="hljs-meta">
# </span><span class="language-bash"><span class="hljs-string">if resourceStorageType is HDFS,defaultFS write namenode address,HA, you need to put core-site.xml and hdfs-site.xml in the conf directory.</span></span>
<span class="hljs-meta"># </span><span class="language-bash"><span class="hljs-string">if S3,write S3 address,HA,for example :s3a://dolphinscheduler,</span></span>
<span class="hljs-meta"># </span><span class="language-bash"><span class="hljs-string">Note,S3 be sure to create the root directory /dolphinscheduler</span></span>
<span class="hljs-meta"># </span><span class="language-bash"><span class="hljs-string">默认FS得知(我们用hadoop的)</span></span>
defaultFS="hdfs://master:9000"
<span class="hljs-meta">
# </span><span class="language-bash"><span class="hljs-string">if resourceStorageType is S3, the following three configuration is required, otherwise please ignore</span></span>
s3Endpoint="http://192.168.xx.xx:9010"
s3AccessKey="xxxxxxxxxx"
s3SecretKey="xxxxxxxxxx"
<span class="hljs-meta">
# </span><span class="language-bash"><span class="hljs-string">resourcemanager port, the default value is 8088 if not specified</span></span>
resourceManagerHttpAddressPort="8088"
<span class="hljs-meta">
# </span><span class="language-bash"><span class="hljs-string">if resourcemanager HA is enabled, please set the HA IPs; if resourcemanager is single node, keep this value empty</span></span>
<span class="hljs-meta"># </span><span class="language-bash"><span class="hljs-string">启用了HA</span></span>
yarnHaIps=""
<span class="hljs-meta">
# </span><span class="language-bash"><span class="hljs-string">if resourcemanager HA is enabled or not use resourcemanager, please keep the default value; If resourcemanager is single node, you only need to replace '</span>yarnIp1<span class="hljs-string">' to actual resourcemanager hostname</span></span>
<span class="hljs-meta"># </span><span class="language-bash"><span class="hljs-string">未启用HA</span></span>
singleYarnIp="master"
<span class="hljs-meta">
# </span><span class="language-bash"><span class="hljs-string">who has permission to create directory under HDFS/S3 root path</span></span>
<span class="hljs-meta"># </span><span class="language-bash"><span class="hljs-string">Note: if kerberos is enabled, please config hdfsRootUser=</span></span>
hdfsRootUser="hdfs"
<span class="hljs-meta">
# </span><span class="language-bash"><span class="hljs-string">kerberos config</span></span>
<span class="hljs-meta"># </span><span class="language-bash"><span class="hljs-string">whether kerberos starts, if kerberos starts, following four items need to config, otherwise please ignore</span></span>
<span class="hljs-meta"># </span><span class="language-bash"><span class="hljs-string">hdfs超级用户(谁启动的)</span></span>
kerberosStartUp="false"
<span class="hljs-meta"># </span><span class="language-bash"><span class="hljs-string">kdc krb5 config file path</span></span>
krb5ConfPath="$installPath/conf/krb5.conf"
<span class="hljs-meta"># </span><span class="language-bash"><span class="hljs-string">keytab username,watch out the @ sign should followd by \\
keytabUserName="hdfs-mycluster\\@ESZ.COM"</span></span>
<span class="hljs-meta"># </span><span class="language-bash"><span class="hljs-string">username keytab path</span></span>
keytabPath="$installPath/conf/hdfs.headless.keytab"
<span class="hljs-meta"># </span><span class="language-bash"><span class="hljs-string">kerberos expire time, the unit is hour</span></span>
kerberosExpireTime="2"
<span class="hljs-meta">
# </span><span class="language-bash"><span class="hljs-string">use sudo or not</span></span>
sudoEnable="true"
<span class="hljs-meta">
# </span><span class="language-bash"><span class="hljs-string">worker tenant auto create</span></span>
workerTenantAutoCreate="true"
</code></div></pre>
<h3><a id="35__DolpinScheduler_384"></a>3.5 一键部署 DolpinScheduler</h3>
<p>1、启动 Zookeeper 集群</p>
<pre><div class="hljs"><code class="lang-shell">zh.sh start
</code></div></pre>
<p>2、一键部署并启动DolphinScheduler</p>
<pre><div class="hljs"><code class="lang-shell">./install.sh
</code></div></pre>
<p>3、查看 DolphinScheduler进程</p>
<pre><div class="hljs"><code class="lang-shell">jps
</code></div></pre>
<p>4、访问DophinScheduler UI</p>
<pre><div class="hljs"><code class="lang-shell">http://192.168.56.21:12345/dolphinscheduler
</code></div></pre>
<p>初始用户名:admin<br />
初始密码:dolphinscheduler123</p>
<p><img src="https://www.couragesteak.com/tcos/article/cd8405d235e2bb17b1343be4eba6fc10.png" alt="" /></p>
<h3><a id="36_DolphinScheduler_416"></a>3.6 DolphinScheduler启停命令</h3>
<p>进入到安装目录 <code>cd /usr/local/ds/ds_install</code></p>
<p>1、一键启停所有服务</p>
<pre><div class="hljs"><code class="lang-shell">./bin/start-all.sh
./bin/stop-all.sh
</code></div></pre>
<p>2、启停 Master</p>
<pre><div class="hljs"><code class="lang-shell">./dolphinscheduler-daemon.sh start master-server
./dolphinscheduler-daemon.sh stop master-server
</code></div></pre>
<p>3、启停 Worker</p>
<pre><div class="hljs"><code class="lang-shell">./dolphinscheduler-daemon.sh start worker-server
./dolphinscheduler-daemon.sh stop worker-server
</code></div></pre>
<p>4、启停 Api</p>
<pre><div class="hljs"><code class="lang-shell">./dolphinscheduler-daemon.sh start api-server
./dolphinscheduler-daemon.sh stop api-server
</code></div></pre>
<p>5、启停 Logger</p>
<pre><div class="hljs"><code class="lang-shell">./dolphinscheduler-daemon.sh start logger-server
./dolphinscheduler-daemon.sh stop logger-server
</code></div></pre>
<h2><a id="4_DolphinScheduler_455"></a>4 DolphinScheduler入门</h2>
<h3><a id="41__457"></a>4.1 安全中心配置</h3>
<h4><a id="411_Yarn_459"></a>4.1.1 Yarn队列管理</h4>
<p>队列是在执行spark、mapreduce等程序,需要用到“队列”参数时使用的。<br />
此处的队列对应的是Yarn调度器资源队列。故队列概念只对泡在Yarn上的任务类型有效。此处创建出的队列,可供后续任务进行选择。需要注意的是,在DolphinSheduler中创建队列,并不会影响到Yarn调度器的队列配置。</p>
<h4><a id="412__464"></a>4.1.2 租户管理</h4>
<p>租户对应的是 Linux的用户,用于worker提交作业所使用的用户。如果 linux 没有这个用户,默认情况下回导致任务运行失败。可以通过修改 worker.properties 配置文件中参数 worker.tenant.auto.create=true(默认值为flase)实现当linux用户不存在时自动创建该用户。<br />
worker.tenant.auto.create=true 参数会要求 worker 可以免密运行 sudo 命令。</p>
<pre><div class="hljs"><code class="lang-shell">vim /usr/local/ds/ds_install/conf/worker.properties
</code></div></pre>
<h2><a id="_473"></a>报错处理:</h2>
<p><code>org.apache.dolphinscheduler.registry.api.RegistryException: zookeeper connect timeout</code></p>
<pre><div class="hljs"><code class="lang-shell">vim registry.properties
</code></div></pre>
<pre><div class="hljs"><code class="lang-shell">registry.connection.timeout.ms=75000
</code></div></pre>
<p><code>org.apache.dolphinscheduler.api.exceptions.ApiExceptionHandler:[46] - 创建租户错误</code><br />
查看</p>
<pre><div class="hljs"><code class="lang-shell">vim /usr/local/hadoop-2.8.4/etc/hadoop/core-site.xml
</code></div></pre>
<pre><div class="hljs"><code class="lang-shell"><!--配置hdfs默认的命名-->
<property>
<name>fs.defaultFS</name>
<value>hdfs://master:9000</value>
</property>
</code></div></pre>
<p>资源存储类型:HDFS,S3,NONE,修改 install_config.conf</p>
<pre><div class="hljs"><code class="lang-shell">如果resourceStorageType是HDFS,defaultFS写入namenode地址,HA需要把core-site.xml和hdfs-site.xml放到conf目录下。
如果是S3,写S3地址,HA,例如:s3a://dolphinscheduler,
注意,s3一定要创建根目录/dolphinscheduler
</code></div></pre>
<p><code>org.apache.hadoop.ipc.RemoteException: Permission denied: user=hdfs, access=WRITE, inode="/":root:supergroup:drwxr-xr-x</code></p>
<p><code>org.apache.hadoop.security.AccessControlException: Permission denied: user=hdfs, access=WRITE, inode="/":root:supergroup:drwxr-xr-x</code><br />
对非CDH用户</p>
<pre><div class="hljs"><code class="lang-shell">vim /usr/local/hadoop-2.8.4/etc/hadoop/hdfs-site.xml
</code></div></pre>
<pre><div class="hljs"><code class="lang-shell"><!--是否启用hdfs的权限-->
<property>
<name>dfs.permissions</name>
<value>false</value>
</property>
</code></div></pre>
<p>参考地址:<br />
https://blog.csdn.net/g11d111/article/details/72902112</p>
<p>参考地址:<br />
https://www.bilibili.com/video/BV1sa411x7Ep<br />
https://github.com/apache/dolphinscheduler/issues/4389</p>

评论区